
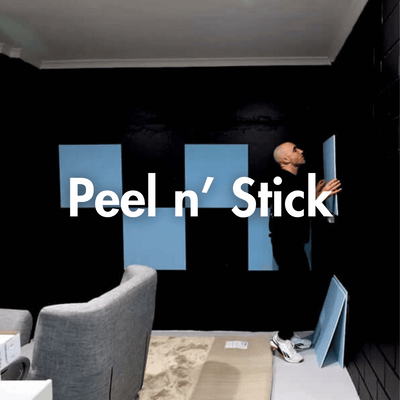


DIY Soundproofing: How Peel n Stick Acoustic Tiles Make It Easy

Soundproofing a space doesn’t have to be complicated or time-consuming, thanks to the ease and versatility of Peel n Stick Acoustic Tiles. Designed for quick, DIY-friendly application, these tiles offer an efficient solution for anyone looking to reduce noise and create a quieter environment - whether at home, in the office, or in a classroom. Here’s everything you need to know about using Peel & Stick tiles for DIY soundproofing.
Why Choose Peel n Stick Acoustic Tiles?
Peel n Stick Acoustic Tiles are an ideal soundproofing solution for DIY enthusiasts or anyone wanting an easy, effective way to control noise without professional help. Unlike traditional panels, Peel n Stick tiles don’t require additional tools or adhesives. Their self-adhesive backing allows them to adhere directly to walls, making installation quick and mess-free.
Benefits of Peel n Stick Acoustic Tiles:
- Simple Installation: These tiles can be applied directly to most surfaces, no tools or extra adhesives needed.
- Effective Noise Control: Peel n Stick tiles reduce echoes and absorb ambient noise, creating a more focused and comfortable environment.
- Versatile Applications: Ideal for various spaces such as home offices, bedrooms, studios, and small commercial spaces.
Step-by-Step Guide to Installing Peel & Stick Acoustic Tiles
-
Prepare Your Surface
Start by cleaning the wall surface where you plan to install the tiles. Make sure it’s dry, dust-free, and smooth for the best adhesive performance. A -
Plan Your Layout
Before peeling the backing, plan where each tile will go. Mark any guidelines if needed, especially if you’re covering a larger area, to ensure a uniform look. Decide if you want a pattern or simply align them evenly across the wall. -
Peel and Stick
Peel off the protective backing from one tile at a time. Carefully press each tile onto the wall, applying firm pressure to ensure a secure bond. Work your way from one corner of the wall to the opposite, pressing tiles side by side. -
Adjust and Align
If a tile isn’t quite straight, gently lift and reposition it before pressing down again. Peel & Stick tiles offer some flexibility, allowing you to make small adjustments for alignment as you go. -
Enjoy Your Soundproofed Space
Once all tiles are in place, step back and enjoy the immediate improvement in sound quality. You’ll notice reduced echoes, clearer conversations, and a quieter overall environment.
Ideal Spaces for Peel & Stick Acoustic Tiles
Peel n Stick Acoustic Tiles are suitable for any area where you need simple, effective noise control. Here are some ideal applications:
- Home Offices: Minimise background noise to improve focus and productivity.
- Recording Studios: Absorb sound for better audio quality in podcasts and music recordings.
- Classrooms: Create a quieter, more focused learning environment.
Tips for Getting the Most Out of Your Peel n Stick Tiles
- Choose the Right Tile: Look for tiles with a high noise absorption rating (NRC) for optimal sound control.
- Avoid Textured Surfaces: Smooth surfaces work best for adhesion; avoid sticking tiles on textured walls or uneven surfaces.
- Experiment with Layout: Try different patterns or alignments to get a design that suits your space’s aesthetics.
With Peel n Stick Acoustic Tiles, creating a quieter, more functional space is easier than ever. Perfect for DIY projects, these tiles allow you to control noise quickly, effectively, and affordably. Whether you’re tackling a home office or setting up a studio, Peel & Stick tiles offer a simple path to better sound quality.


